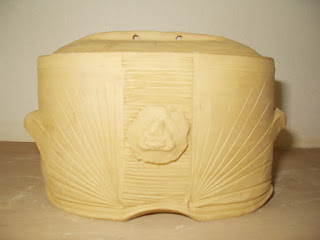
After reading a post on how to make lids on altered vessels I had a go at it.
I had so much fun with this, I couldn't stop so I made a few!
I wanted to put a link to that blog and post in my new post so I searched... and scrolled... and clicked..... but I can't find anymore, bummer! I really wanted to show you the source of my inspiration. :-(
So to whoever made those pictures of the process and explained how to make a lid fit.. Thank You!
As soon as I find you again I'll mention you here, promise!
In short it works like this;
Make a bottomless pot with a gallery and as it has dried a bit alter it into the shape you want. Then make a slab and put your pot on it, cut it out and attach; there's the bottom.
Then make a slab and place it over your pot, you can put some plastic in between to prevent it from sticking.
Then carefully with a rubber rib push the slab downward, sort of into the pot. Then cut of the extra clay.
When it's dry enough to handle flip it over and trim the last bits of.
If you keep the pot itself from drying to much you can then sort of make the pot fit the lid if necessary.
I hope this makes any sense. :-)
Here are my first attempts at this, there al greenware:
A buddhapot, the front. I'm not sure if you can see but the 'stamp' in the middle has a Buddha on it.
same pot, backside. The holes in the lid are for a thread or a piece of leather which will have an attachment on it. I'l show you later..... still thinking about that one.
small box with a different experiment, I wanted an overhanging lid so I attached a coil of clay on the lid, put it over the pot and let it dry..... and offcourse......it was stuck! The pot was dryer than the lid so the lid shrunk more....o well I thought, let's see what happens and I forced the lid of and a part of the attached coil broke off. when I then put the lid back on it fitted fine and looked kinda ok. After a while I really liked it so here it is...
Another white box, with a 'rounded' bottom. I have to admit that this lid doesn't fit very well, it shrunk a bit to much. What I learned here (again!) is to not let the pot get to dry but try to keep them in as much the same state as possible so they dry evenly. Maybe I'll glaze the gallery on this one as to fill some space, will that work? Hm, just don't forget to not put the lid on the pot then and hope they still fit together after the glazefiring.
I like this handle, what do you think?
This was my first one, there are two holes in the middle of the lid, I want to put a handle ore knob made from a different material on it so I made two holes to attache that (somehow). Don't know how or what yet. I'll let the pot speak to me when it's fired and glazed.
That's it for now.
I hope you are all enjoying your weekend!
I'm of to do get some groceries and then into the studio. My mum asked me to make a vase for her a while ago. Today she came by to remind me... oops.... better get to work! :-D
Be happy and enjoy whatever you are doing,
blessed be,
Monique


No comments:
Post a Comment